Community
Run a private community for your clients with posts, comments, and reactions.
Community Overview
Build private group spaces for your clients to share updates, spark discussions, run polls, and stay engaged between sessions. Each community has its own feed of posts, a member list, pinned content, and configurable permissions.
Your Community page shows all the communities in your workspace. From here you can:
- View each community's name, header image, and member count
- See an unread indicator when new posts have been published since your last visit
- Edit or delete any community from the list
- Click into a community to view its feed and manage it
When you open a community, you see four tabs:
| Tab | What it shows |
|---|---|
| Discussion | The main feed with posts, comments, and reactions |
| Pinned | Posts you have pinned for visibility |
| Planner | Your scheduled and draft posts (coach only) |
| Members | A searchable list of all community participants |
From the community header you can also access quick actions: Manage Access to add or remove members, a search button to find posts, and a dropdown menu with Edit Community, Community Settings, and Notification Settings.
Creating a Community
Your new community is created and you are automatically added as the owner. You can now add members and start posting.
Editing a Community
You can update a community's name, description, and header image at any time.
From the community list
From inside a community
Deleting a Community
Managing Members
Members are the clients and team members who can see and participate in a community. Only workspace owners can add or remove members.
Adding members
Removing members
Viewing the member list
Switch to the Members tab inside any community to see a searchable table of all active participants. Each entry shows the member's name, profile image, role badge (coaches show an admin badge), and when they joined.
Creating Posts
Posts are the core content in a community. You can include text, images, videos, GIFs, and polls.
| Button | Action |
|---|---|
| Image | Upload up to 4 images |
| Video | Upload a video |
| GIF | Search and pick a GIF |
| Poll | Add a poll (see Polls below) |
| Emoji | Insert an emoji into your text |
Saving Drafts and Scheduling Posts
As a coach, the Publish button includes a dropdown with additional options:
| Option | What it does |
|---|---|
| Publish | Post immediately to the feed |
| Save draft | Save the post privately for later editing |
| Schedule post | Choose a future date and time to auto-publish |
Saving a draft
Drafts are private to you. No one else can see them.
Scheduling a post
Scheduled posts are automatically published at the chosen time.
The Planner Tab
The Planner tab gives you a single view of all your draft and scheduled posts for a community.
Switch between two segments:
- Scheduled: Shows posts sorted by their scheduled publish time (earliest first)
- Drafts: Shows drafts sorted by creation date (newest first)
Each post card shows a preview of the content, and offers three actions:
| Action | What it does |
|---|---|
| Edit | Opens the post editor to update content, media, or scheduling |
| Delete | Permanently deletes the draft or scheduled post |
| Publish Now | Immediately publishes the post to the feed |
Editing and Deleting Posts
Editing a post
Edited posts display an "edited" indicator. You can only edit your own posts. Polls cannot be edited after creation.
Deleting a post
Members can delete their own posts. Workspace owners can delete any post in the community.
Pinning Posts
Pinned posts appear in a dedicated section at the top of the Discussion tab and in the Pinned tab, making them easy for members to find.
To unpin a post, open the same menu and select Unpin Post.
Pinned posts display as compact cards that scroll horizontally. Click any card to open the full post with comments.
Reactions
Members can react to posts using seven reaction types:
| Reaction | Type |
|---|---|
| Like | like |
| Love | love |
| Care | care |
| Haha | haha |
| Wow | wow |
| Sad | sad |
| Angry | angry |
Comments and Replies
Comments and replies support the same @mention and GIF features as posts.
Commenting on a post
The three most recent comments are shown by default. Click View all comments to expand. Click the post to open the full post modal with all comments visible.
Replying to a comment
Replies are nested under their parent comment.
Liking comments and replies
Click the like button on any comment or reply to toggle a like.
Editing comments and replies
You can edit your own comments and replies. Edited comments display an "edited" indicator.
Deleting comments and replies
You can delete your own comments and replies. Workspace owners can delete any comment or reply.
Polls
Polls let you survey your community with a quick vote. Members can select one option.
To create a poll, click the Poll button in the post composer action bar, add your options, and publish. Polls cannot be edited after creation and each member can vote once.
Searching Posts
Use the search feature to find posts by keyword across the entire community.
Your last three searches are saved as recent searches for quick access.
Community Settings
Community Settings control what clients can do inside the community. Open them from the dropdown menu in the community header.
| Setting | Default | Description |
|---|---|---|
| Allow Client Posting | On | When off, only coaches can create posts. Clients see the feed but cannot post. |
| Allow Client Comments | On | When off, clients cannot comment or reply. They can still react to posts. |
| Show Member List | On | When off, clients cannot see the Members tab or the member list. |
Changes take effect immediately. These settings apply only to clients, coaches and team members are not affected.
Notification Settings
Each community participant can configure their own notification preferences. Open Notification Settings from the dropdown menu in the community header.
| Setting | Default | Description |
|---|---|---|
| New Posts | On | Notify when new posts are published in this community |
| Likes | On | Notify when someone reacts to your post |
| Comments | On | Notify when someone comments on your post |
| Mentions | On | Notify when someone @mentions you |
| Poll Votes | On | Notify when someone votes on your poll |
These are per-community, per-user settings. Each member controls their own notifications independently.
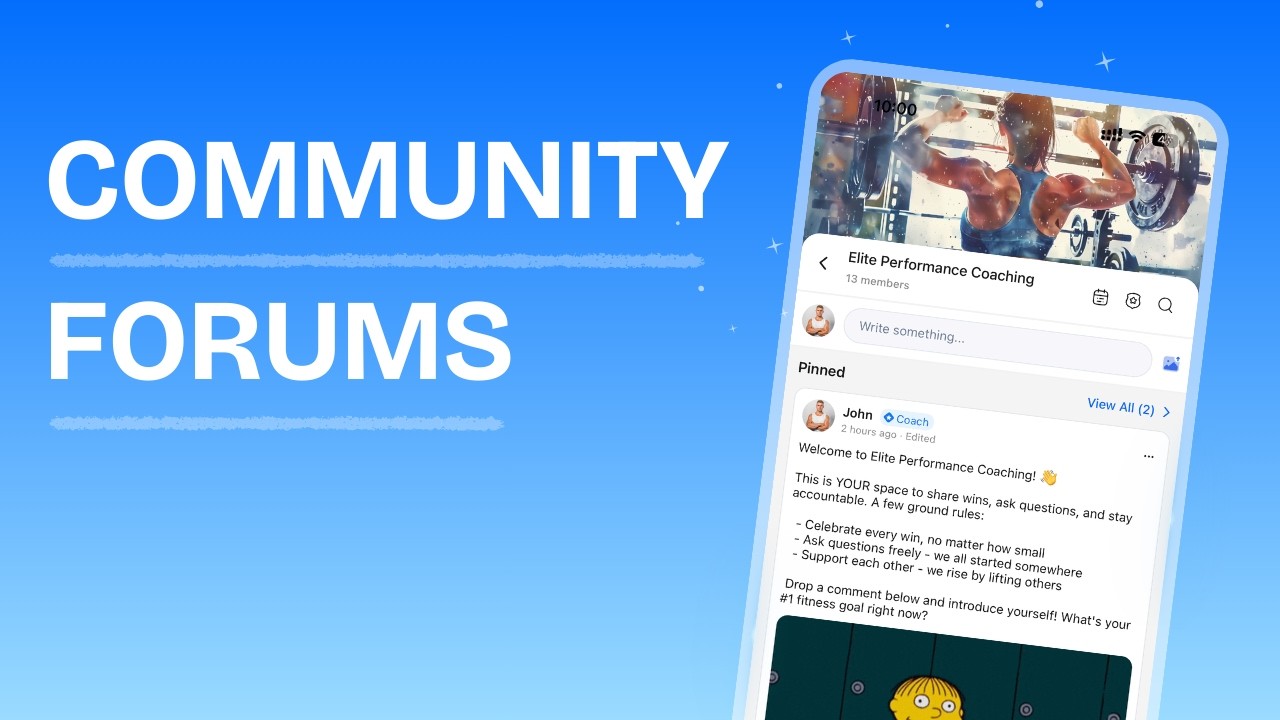
Community on the Mobile App (Coach)
The Community feature works on the HubFit mobile app with a native interface optimized for phone screens.
Viewing a community
When you open a community on the app, you see:
- A header image that scrolls with the content, with a sticky header that appears as you scroll down
- The community name and member count
- A post composer (if you have posting permissions)
- Pinned posts in a horizontal scroll
- The post feed with infinite scroll and pull-to-refresh
Quick actions (top right)
- Calendar icon: Opens the Planner to view scheduled and draft posts
- Settings icon: Opens community settings
- Search icon: Opens post search
Community settings on mobile
Tap the settings icon to access:
- Edit: Update the community name, description, and cover image
- Notifications: Configure your notification preferences
- Settings: Toggle client permissions (owner only)
- Add Member: Invite clients and team members
- Remove: Remove members from the community
- Delete Community: Permanently delete the community (owner only)
The member list is visible directly on the settings screen, showing each participant's name, profile image, and role.
Frequently Asked Questions
Why can a client not post in a community? You have disabled client posting for that community in Community Settings. The client can still read posts and react.
Why can a client not comment on posts? You have disabled client comments for that community in Community Settings. The client can still read posts and react.
Why can a client not see the member list? You have hidden the member list for that community in Community Settings.
Can clients change their vote on a poll? No. Poll votes are final and cannot be changed once submitted.
How do members manage their notification preferences? Each member can open the community, go to the dropdown menu (web) or settings icon (mobile), and select Notification Settings to toggle notifications for new posts, reactions, comments, mentions, and poll votes.
How do I mention someone in a post or comment? Type @ followed by their name. The mentioned person receives a push notification if they have mentions enabled. Workspace owners can use @everyone to notify all community members.
What happens to a client's community access when they are archived? Archived clients are automatically removed from all communities. When unarchived, they need to be re-added manually.
Did this answer your question?