Forms
Build intake forms, check-ins, and questionnaires for your clients.
Forms Overview
Forms let you build check-ins and questionnaires to collect structured information from your clients on a recurring or one-off basis. The Forms page has two tabs:
- Check-Ins: Recurring forms sent to individual clients on a schedule (daily, weekly, bi-weekly, or monthly)
- Questionnaires: One-off forms stored in your library and assigned to one or more clients
From these tabs you can:
- Create new check-in forms and questionnaire forms from scratch
- Start from a pre-built template
- Import forms from your library to a client
- Set automated reminder schedules
- Duplicate or delete existing forms
When you open a client's profile and navigate to their Check-Ins section, you'll see a different set of tabs:
- Assigned: The check-in forms currently assigned to this client, with their schedule and next due date
- Submissions: Every response the client has submitted, with review status
Understanding Form Types
HubFit has two distinct form types, each designed for a different purpose.
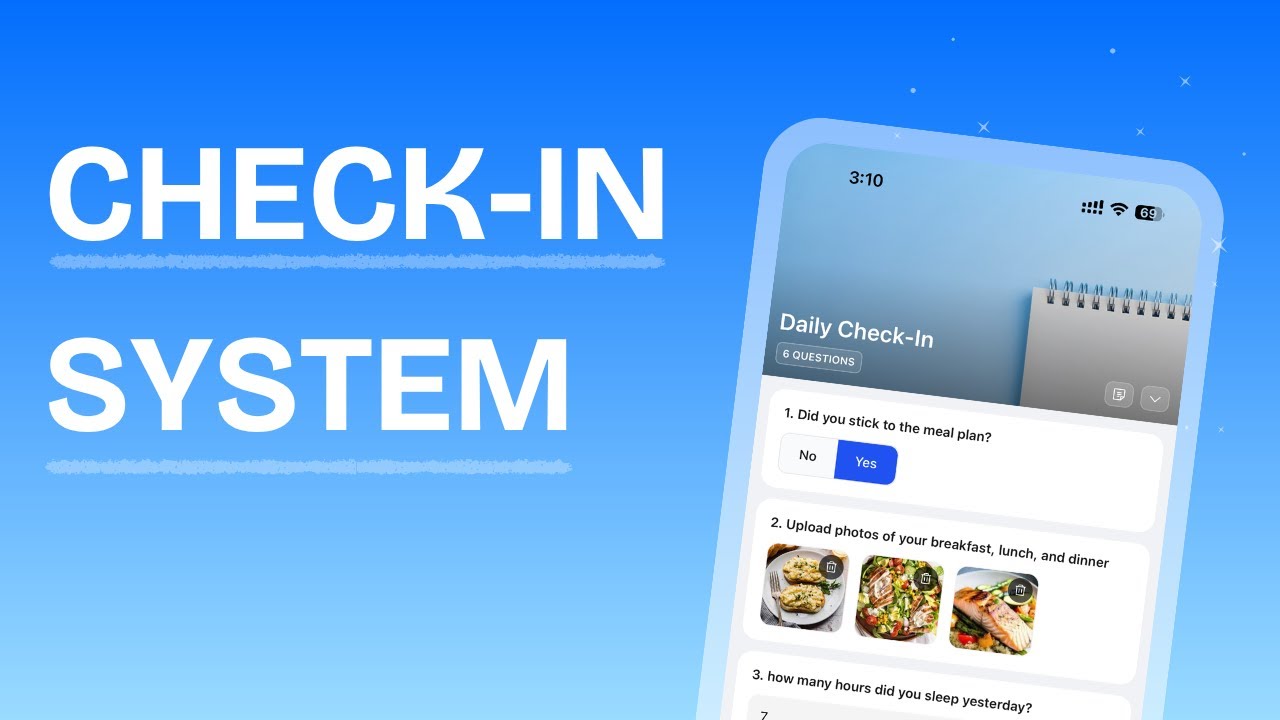
Check-In
A recurring form assigned to a specific client. Check-ins are tied to a schedule so the client receives reminders at the cadence you set. Each check-in belongs to one client and tracks submissions over time.
When you import a check-in from your library or a template, it creates an independent copy for that client. You can customise the questions and schedule per client without affecting the original template or other clients.
Use check-ins for:
- Daily accountability logs
- Weekly progress reviews
- Bi-weekly or monthly deep dives
- Any recurring data collection from a single client
Questionnaire

For a video overview, see Questionnaires Overview
A one-off form stored in your library and assigned to one or more clients at a time. Questionnaires do not have schedules or reminders, they are sent once, and the client completes them at their own pace. Once submitted, the client is automatically unassigned from the questionnaire.
Use questionnaires for:
- Client onboarding and intake forms
- PAR-Q health screenings
- Goal planning questionnaires
- Feedback surveys and testimonials
Question Types
When building a form, you choose from a set of question types. Each type controls how the client answers the question and how the data is captured.
Standard Question Types
| Type | Description | Client Input |
|---|---|---|
| Text | Free-form text response | Small or long text field |
| Number | Numeric value | Integer, float, or decimal input |
| Multiple Choice | Predefined options (single or multi-select) | Radio buttons or checkboxes (up to 10 options) |
| Scale (1-10) | Numeric scale from 1 to 10 | Slider or number selector |
| Yes/No | Binary toggle | Yes or No |
| Media | Photos or videos | Upload 1-5 files (configurable) |
| Date | Calendar date | Date picker |
| Star Rating | Rating from 1 to 5 stars | Star selector |
| Signature | Digital signature capture | Draw-to-sign pad |
Synced Question Types
Synced question types automatically push data into other areas of the client's profile when they submit a response.
| Type | Description | Sync Behavior |
|---|---|---|
| Progress Photos | Front, back, and side photos | Syncs to the client's photo gallery |
| Metric | Numeric value tied to a specific metric | Syncs to the client's Metrics section |
Creating a Check-In Form
Check-in forms are created either from your Forms library (to use as a template) or directly on a client's profile (to assign immediately).
From the Forms page (library)
From a client's profile
Creating a Questionnaire
Questionnaires live in your Forms library and are assigned to clients from their profile.
Using Form Templates
HubFit provides pre-built templates for both check-ins and questionnaires. When creating a form, switch to the Templates tab to browse and select one. Templates come with questions pre-filled — you can customise them after importing.
Setting a Check-In Schedule
Schedules control when your client receives push notification reminders to fill out their check-in. Only check-in forms support scheduling (questionnaires do not).
Schedule Frequency Options
| Frequency | Configuration | How It Works |
|---|---|---|
| Daily | Select one or more days of the week | Reminder fires on every selected day (e.g. Mon-Fri only, or all 7 days) |
| Weekly | Select one day of the week | Reminder fires once per week on the chosen day |
| Bi-weekly | Select one day of the week + choose Week 1 & 3 or Week 2 & 4 | Reminder fires every other week based on the week-of-month pattern |
| Monthly | Choose Start of month, End of month, or Specific day (1st-28th) | Reminder fires once per month on the chosen date |
Assigning Questionnaires to Clients
Questionnaires are assigned from a client's Overview tab.
The client receives a notification when a questionnaire is assigned. Assigned questionnaires appear as buttons on the Overview — incomplete ones are plain, completed ones show a checkmark. Click any questionnaire to view the client's responses.
Once submitted, the questionnaire is automatically marked as complete. To unassign a questionnaire before the client submits it, click on it and select Unassign Questionnaire.
Duplicating Forms
You can duplicate any check-in or questionnaire to create a copy with the same questions.
Reviewing Check-In Submissions
When a client submits a check-in, it appears in your Check-Ins dashboard. The dashboard shows all submissions across your clients, grouped by review status.
The Check-Ins Dashboard
The Check-Ins page (accessible from the sidebar) displays a table of all recent check-in submissions with:
- Client: Who submitted the check-in
- Check In: The name of the form
- Submitted At: When it was submitted (relative time, e.g. "2 hours ago")
- Status: Either "Pending" (orange) or "Reviewed" (blue)
- Assigned To: Which team member is responsible for this client (if team members are enabled)
You can filter and sort the dashboard using:
- Search: Filter by client name or check-in name
- Submitted: Filter by time range (Last 7 days, Last 14 days, Last 30 days, All time)
- Sort by: Latest Check-Ins or Oldest Check-Ins
- Assigned to: Filter by team member (or show unassigned clients)
Reviewing a submission
When you save a review:
- The submission status changes from "Pending" to "Reviewed"
- The client receives a push notification with your comment
- The client receives an email with your review
- Your review progress updates in the dashboard
Viewing Submission History
You can view a client's full submission history for any check-in form, and compare answers over time.
Browsing submissions
Comparing check-ins
Managing Forms on a Client's Profile
When you open a client's profile and navigate to their Check-Ins section, you have access to both assigned forms and past submissions.
Assigned tab
The Assigned tab shows all check-in forms currently assigned to the client. Each row displays:
- Form: Name and question count
- Schedule: The reminder frequency (e.g. "Daily (weekdays)", "Weekly on Mon", "Monthly (1st)")
- Next Due: The next scheduled reminder date
From this tab you can:
- Click a form to open the form builder and edit questions
- Edit the form name, description, or cover image
- Delete a form from the client's assigned list
Submissions tab
The Submissions tab shows every response the client has submitted. Click any submission to view the full response, including your review notes (if any). You can also delete individual submissions from this view.
How Clients Use Forms
Clients interact with forms through the mobile app. Here is what to expect from their side so you can guide them.
Questionnaires. When you assign a questionnaire, it appears as a task on the client's Dashboard. The client taps it, answers each question, and submits. Once submitted, it is marked as complete.
Check-ins with a schedule. When a scheduled check-in is due, it appears as a task on the client's Dashboard and they receive a push notification. The client taps it, fills it in, and submits. If they miss the scheduled date, the task stays on the Dashboard and shows as overdue until the next check-in is due. They can also submit it at any time from their Profile tab (see below).
Check-ins without a schedule. You do not have to set a schedule on a check-in. If there is no schedule, the check-in will not appear as a task on the Dashboard. Instead, the client submits it manually from their Profile tab whenever they are ready.
Profile tab. Clients can always view all their assigned check-ins from the Check-Ins section on their Profile tab. This is where they go to fill in a check-in at any time — whether it is scheduled, overdue, or has no schedule at all. This also allows clients to backfill missed check-ins.
After submission. You are notified immediately. Any synced question types update automatically — progress photos land in the client's photo gallery and metric answers write to their metric history. When you review and leave a comment, the client receives a push notification and email with your feedback.
Frequently Asked Questions
Can clients edit their answers after submitting? No, submissions are final. You can ask the client to fill out the form again.
What happens when a client misses a scheduled check-in? The task stays on the client's Dashboard and shows as overdue until the next check-in is due. For example, a weekly check-in due on Monday will show as overdue until the following Monday. The client can also always submit from their Profile tab to backfill.
Can I assign the same questionnaire to multiple clients? Yes. Questionnaires live in your library and can be assigned to as many clients as needed.
Do changes to a questionnaire affect clients who already have it assigned? Yes. Edits to a questionnaire in your library apply to all clients who have not yet submitted it.
Why did my new client receive a check-in straight away? Check-in schedules are synced across your workspace, so all clients with the same schedule submit on the same days. This keeps your review workflow predictable — instead of receiving check-ins scattered across every day of the week, they arrive together on set days. For example, if you set a bi-weekly check-in for every 1st and 3rd Monday, and a new client joins on a Sunday, they will receive their first check-in the very next day because that Monday is already a scheduled date for your workspace.
What is the difference between a check-in and a questionnaire? Check-ins are recurring forms with a schedule and reminders. Importing a check-in creates an independent copy per client, so you can customise it for each person. Questionnaires are one-off forms that stay linked to your library and are assigned to one or more clients at a time.
Can I see which clients have overdue check-ins without opening each profile? No. There is no overview screen for overdue check-ins across all clients. You need to open each client's profile to check their submission status.
How does my feedback on a check-in reach the client? Your response is attached to the check-in submission. The client receives a push notification and an email, and can view your feedback directly on that submission in the app. Clients cannot reply to check-in feedback.
Can I delete a client's check-in submission? No. Only the client can delete their own submissions from the app.
Did this answer your question?